FeedAd AppLovin MAX Integration
The FeedAd Android SDK can be easily combined with the AppLovin MAX SDK for Android. All you have to do for this, is to add a our AppLovin plugin as a dependency to your app.
To see an example, please check out our Android demo app.
Supported Ad Types
The following ad types are supported by the Adapter Plugin:
- Banner
- Interstitial
- MREC
- Native Ad (Manual)
The native ad integration will require some publisher adjustments. Read the native ad section for more information.
Quick Start
If you are familiar with adding and configuring 3rd party networks with AppLovin, the following points have all the information you will need. Otherwise, just continue reading for a step-by-step guide.
| Component | Configuration | Options |
|---|---|---|
| Plugin Dependency | implementation('com.feedad.android:feedad-applovin:1.1.0') |
none |
| Custom Adapter Class | com.feedad.android.applovin.FeedAdMediationAdapter |
none |
| Ad Unit Placement ID | your-placement-id |
none |
| Ad Unit Custom Parameters | {"clientToken": "your-client-token"} |
as JSON:clientToken: String required |
| Placeholder Image Style | <item name="appLovinFeedAdPlaceholderImage">...</item> |
drawable or color resource, or raw color |
| Loading Indicator Toggle | <item name="appLovinFeedAdShowLoadingIndicator">...</item> |
boolean value |
Step-By-Step
1. Dependencies
Make sure that the FeedAd SDK, AppLovin SDK, and the FeedAd AppLovin Plugin are all inside your build.gradle dependencies section.
dependencies {
    // any recent AppLovin version will do
    implementation 'com.applovin:applovin-sdk:11.10.1'
    implementation 'com.feedad.android:feedad-applovin:1.1.0'
    implementation('com.feedad.android:feedad-sdk:1.7.1') {
        transitive = true
    }
}
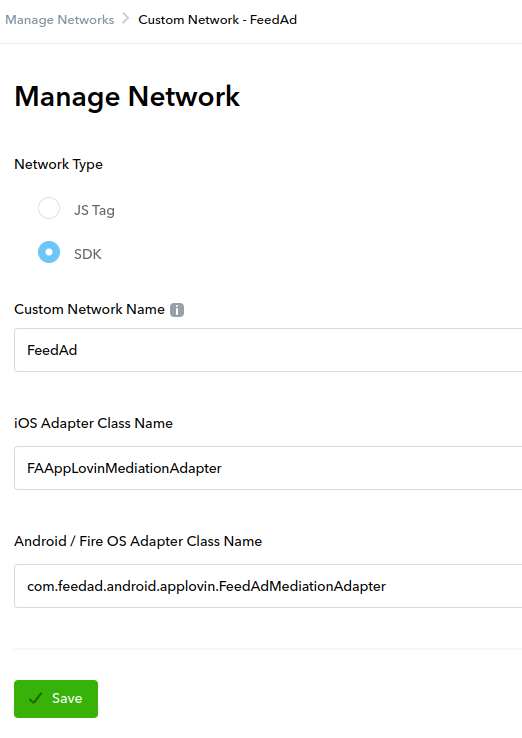
2. Create The Adapter
- Open your AppLovin MAX dashboard at https://dash.applovin.com.
- Goto
Max → Manage Ad Networks. - Click on 'Click here to add a Custom Network' at the bottom of the page.
- Choose Network Type 'SDK'.
- Enter the custom network name. For example 'FeedAd'.
- Enter
com.feedad.android.applovin.FeedAdMediationAdapteras 'Android / Fire OS Adapter Class Name'. - Save
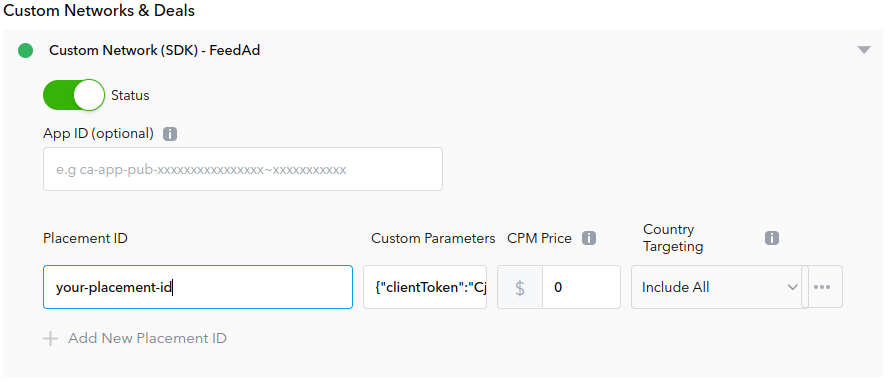
3. Create and Configure an Ad Unit
- Goto
Max → Manage Ad Unitsand select any ad unit you want to use FeedAd with, or create a new one. - Within the 'Custom Networks & Deals' section, enable the FeedAd network by switching the 'Status' switch.
- Enter a 'Placement ID' of your linking (or one that was discussed with our operations team). Read below for more.
- Enter your client token as JSON within the 'Custom Parameters' field, using the format:
{"clientToken":"your native client token"}
Placement ID?
You can choose placement IDs yourself. A placement ID should be named after the ad position inside your product.
For example, if you want to display an ad inside a list of news articles, you could name it "ad-news-overview".
A placement ID may consist of lowercase a-z, 0-9, - and _. You do not have to manually create the placement IDs before using them.
Just specify them within the code, and they will appear in the FeedAd admin panel after the first request.
Learn more about Placement IDs and how they are grouped to play the same Creative
4. SDK Configuration
AppLovin does not feature an app-wide adapter configuration. The SDK will initialize when it receives the first ad request. Because it is not known which ad unit will be requested first, you will have to add the configuration JSON to each ad unit using our adapter.
The configuration is formatted in the JSON format, and is entered within the "Custom Parameters" of the custom ad network's ad unit (see step #3)
Parameters
| Name | Values | Description |
|---|---|---|
clientToken |
String |
required, the FeedAd client token of your FeedAd publisher account. |
enableLogging |
"true", "false" |
optional, if the FeedAd SDK will print debug messages into the logcat. |
allowLocationDataUsage |
"true", "false" |
optional, if the SDK is allowed to send geolocation data alongside ad requests. |
cancelable |
"true", "false" |
optional, interstitial only. If the user can cancel the interstitial at any time by pressing the back button. (default: false) |
Location data usage
The SDK does neither specify location service permissions inside its manifest, nor does it request permission, if it is not given at request time.
All implementation regarding location service permissions have to be written by you within your app code.
If the flag is set to true, but the user has not given permission before the ad request is sent, the request will be sent without any location data.
Please discuss with your FeedAd account manager, if enabling location data usage is sensible for your use-case.
Native Ads
Native Ad Unit Template
You will have to choose the "manual" native ad template for the AppLovin ad unit. Using the default templates will prevent you from editing the layout in a way, that FeedAd can be displayed in its full size.
The AppLovin MAX SDK lets the publisher design the layout for native ads. All native ad responses, no matter what adapter they come from, will use this layout.
Because most native ads feature information like title, call-to-action buttons, app icons, etc., the layout should provide views for each of those fields.
However, FeedAd can only provide its playing surface. If you want to display FeedAd on a native ad unit, you will have to adjust your layout to only display the media content, if you receive FeedAd fill. Our AppLovin plugin can help you with that:
// use our container class for the MaxNativeAdView
MaxNativeAdView nativeAdView = new FeedAdMaxNativeAdView(binder, this) {
   @Override
   public void layoutForFeedAd(@NonNull FeedAdView feedAdView) {
       // update your layout in a way, that the mediaContentViewGroup is displayed in its full size
       ViewGroup mediaContentViewGroup = getMediaContentViewGroup();

       //...
   }
};
nativeAdLoader.loadAd(nativeAdView);
You can also have a look at our example app.
It works as follows:
- The
FeedAdMaxNativeAdViewwraps the defaultMaxNativeAdviewand delegates all functionality to the AppLovin implementation. - If a native ad of any other adapter than FeedAd is returned, it will behave just as the default
MaxNativeAdView. - If a FeedAd ad is returned, it will detect it and the method
layoutForFeedAd(...)will be invoked. - In this method, all views other than the
mediaContentViewGroupshould be hidden, and the view group should be resized to fill the whole ad. - Because native ads do not rotate, and the view tree is recreated for a newly loaded ad, you will not have to reset the modifications made for the FeedAd display.
Ad View Customizations
Placeholder Image
You can specify a placeholder drawable that is shown inside the ad view if FeedAd has completed its ad playback and the view is still visible. This is especially required for native ads, because of a minor conflict between AppLovin and FeedAd, and how they display ads:
- AppLovin shows native ads indefinitely.
- FeedAd plays mostly video ad playlists with videos of different lengths.
- AppLovin lacks the ability to trigger the reloading of an ad view from within an adapter.
This can cause a situation wherein FeedAd has no more ads to play but is still visible within the AppLovin ad view. For example:
- AppLovin loads FeedAd into a native ad view, that the user has in view for 40s.
- FeedAd plays a playlist of a 20s and 15s long videos.
- When FeedAd completes its playlist, the ad view will still be visible for 5s to the user.
Those 5 seconds can be filled with a given placeholder drawable or color. If none is given, FeedAd will default to gray.
For banner ads, the placeholder image will bridge the loading gap in between video ads, and the transition from FeedAd to the ad of any other ad adapter.
There are two options to configure the placeholder image:
Using the App Theme
Add the attribute appLovinFeedAdPlaceholderImage to your app's theme. This attribute accepts any drawable resource, or raw color value.
<!-- Your app theme -->
<style name="AppTheme" parent="Theme.AppCompat.Light">
    <!-- drawable resource -->
    <item name="appLovinFeedAdPlaceholderImage">@drawable/some_drawable</item>
    <!-- or color resource -->
    <item name="appLovinFeedAdPlaceholderImage">@color/some_color</item>
    <!-- or raw color -->
    <item name="appLovinFeedAdPlaceholderImage">#FeedAd</item>
</style>
Using the FeedAd View API (Native Ads only)
For native ads, you can specify this drawable (or color) within the layoutForFeedAd method using the FeedAdView API:
MaxNativeAdView nativeAdView = new FeedAdMaxNativeAdView(binder, this) {
    @Override
    public void layoutForFeedAd(@NonNull FeedAdView feedAdView) {
        feedAdView.setShutterDrawable(...);
    }
};
Loading Indicator
You can specify, if the loading indicator should be shown for banner or native ads. This option can be used in combination with the placeholder image, to show a graphic in between ads that is not overlaid by a loading spinner.
By default, the loading indicator will be shown.
There are two options to configure the loading indicator:
Using the App Theme
Add the attribute appLovinFeedAdShowLoadingIndicator to your app's theme.
<!-- Your app theme -->
<style name="AppTheme" parent="Theme.AppCompat.Light">
    <item name="appLovinFeedAdShowLoadingIndicator">false</item>
</style>
Using the FeedAd View API (Native Ads only)
For native ads, you can specify this flag within the layoutForFeedAd method using the FeedAdView API:
MaxNativeAdView nativeAdView = new FeedAdMaxNativeAdView(binder, this) {
    @Override
    public void layoutForFeedAd(@NonNull FeedAdView feedAdView) {
        feedAdView.setShowLoadingIndicator(false);
    }
};